Wednesday, September 30, 2009
Some very cool Blog Candy!!
Hey just wanted to share with you all that there is an excellent set of blog candy At bevs crafts! For your chance to win, go here: http://bevscrafts.blogspot.com/2009/09/whiff-of-joy-candy.html If you aren't interested in the blog candy, you should check out her blog, it has some pretty cool stuff on it! :)
Monday, September 28, 2009
Cricut Celebrates 100 Cartridges with Giveaway! Week 4
Yep, you heard it right the wonderful folks at Provo Craft are celebrating reaching 100 carts by giving away 100 of their Winter Woodland carts! They are giving away 20 cartridges a week for 5 consecutive week and this is already week 4 so don't miss your chance to win one! Head on over to the Cricut MB to enter here:http://www.cricut.com/messageboard/tm.aspx?m=5362208
and in the meantime, check out the truly awesome Winter Woodland cart here: http://www.cricut.com/shopping/ProductDetails.aspx?id=361&s=1&sc=2
Good Luck to you all, I hope you win....um wait.. I hope I win!!! hehe, no really, good luck to everyone! :)
and in the meantime, check out the truly awesome Winter Woodland cart here: http://www.cricut.com/shopping/ProductDetails.aspx?id=361&s=1&sc=2
Good Luck to you all, I hope you win....um wait.. I hope I win!!! hehe, no really, good luck to everyone! :)
Diaper Cake

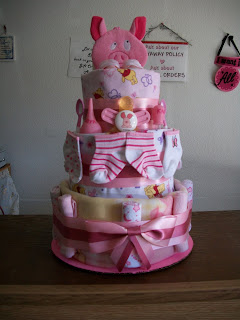
These are so very cute when finished and so easy to make! Don't let the look intimidate you. You too will find that it is very simple to do. The best thing about it is that no two cakes ever turn out the same because it all depends on what you decide to add to it to make it your own design. Below I will post instructions and you will be making them yourself in no time!
Ingredients:
1 cardboard cake round (can be purchased at joanns or walmart)
56 pack of newborn or size one diapers ( the smaller the diapers, the smaller the cake - this particular one is size one diapers)
56 small rubberbands
3 large rubber bands or enough yarn to tie around each layer
3 blankets or recieving blankets in coordinating colors
T pins or diaper pins to hold blanket layers in place
3pk of newborn socks
5pk of baby washcloths
Assorted other baby items for decorations - your choice
3 1/2 yards of 3" wide ribbon (color coordinate with blankets)
3 1/2 yards of 1" wide ribbon
To begin with you can either leave your cardboard cake round white or paint it either pink or blue.
Take diapers and roll each one from the top to the bottom so that they make a nice cylindrical shape, put a small rubber band around the middle of each one to hold shape - once you are done rolling you are going to take 28 for bottom layer, 19 for middle layer and 9 for top layer. As you pull all the diapers together in a layer, wrap a large rubber band around them to keep in place, making sure that you turn all diaper edges to the inside and that overall appearance is round.
Now, you are going to take the blankets and fold each one to where they are at their longest. You are going to want the blanket to cover the entire diaper, with about 1/2 inch of the blanket standing above the top of the diaper layer. This is so that the next layer will sit down inside the previous layer. Do the same for middle and top layers. You will secure each blanket in the back with Tpins or diaper pins. Some people choose to use a wooden dowel carefully inserted through all three layers in order to hold the layers in place, but sometimes I just use double sided sticky tape as I did with this particular cake.
You will want to cut each of the ribbon together to fit each separate layer. You can choose to hot glue these to hold in place, making sure not to get glue on blankets or you can opt to use no ribbon at all, it is still just as cute. There should be plenty of ribbon left over to make your bow.
Now it is time to decorate the layers. As you can see, I did baby washcloths on bottom layer by just placing them inside of the ribbon layer second layer of socks I held in place with double sided tape, by placing part inside the sock and the rest over the top edge of the baby blanket.
I sat the spoons, nasal aspirator, teething ring and medicine dropper between the top layer and the inside of the middle layer blanket. Shoes I put on top as a topper and then the piggy washcloth I attached with tape to make him look like he was hugging the cake. On the back side, I added the diaper wipe case that I personalized with vinyl, and two newborn baby t'shirts. And that is it... super simple, so give it a try next time you need a fun shower gift. This one was totally the hit of the baby shower, which I forgot to mention was for my cousins oldest daughter who is having her first baby, a girl named Kaiya! Everyone marveled over the work that they thought went into it and raved about how cool it was to have everything personalized! A gift well worth taking the time to do :) TFL
Labels:
baby,
baby shower,
diaper cake,
diapers,
personalized items,
vinyl
Monday, September 21, 2009
Cricut Cartridge Celebration Week #3
Don't miss your chance to win the awesome Winter Woodland Cartridge absolutely free! To celebrate reaching 100 carts, Cricut is giving away100 of their Winter Woodland carts. They are giving away 20 carts a week for 5 weeks. This is already week 3 of the celebration, so you need to hurry on over to the forum for your chance to win! http://www.cricut.com/messageboard/tm.aspx?m=5316808
Check out the Winter Woodland cart here: http://www.cricut.com/shopping/ProductDetails.aspx?id=361&s=1&sc=2
If you're anything like me, you are already dreaming about all the possibilities that this cart hold in store for you!
Good Luck to everyone!
Check out the Winter Woodland cart here: http://www.cricut.com/shopping/ProductDetails.aspx?id=361&s=1&sc=2
If you're anything like me, you are already dreaming about all the possibilities that this cart hold in store for you!
Good Luck to everyone!
Sunday, September 20, 2009
Baby Wipe case
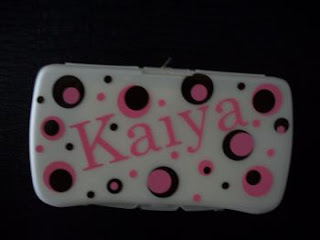
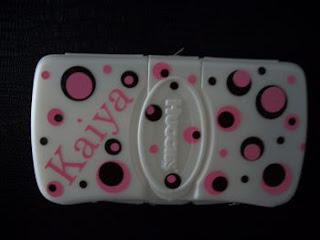
My Cousin's daughter is having her first lil baby, a girl, in November. I loved the look of the polkadot wipe cases that you always see on the Cricut MB, but one in particular, designed by Butter-Cup aka Marilyn from http://marilynscreativemoments.blogspot.com/, really caught my eye. I love the way she had put the name on the front and the back, so I asked her if I could scraplift her idea. She said sure! I had fun making this, hope Wendi likes it as well! TFL
Artsy Fartsy Scraproom: Blog Candy Update
Artsy Fartsy Scraproom: Blog Candy Update
If you haven't already checked out this blog, YOU NEED TO! Always a lot of inspiration to be found here, plus there is an awesome blog candy contest right now with some awesome prizes. Who ever wins is going to have some fun! Be sure to check out the rest of her blog as well!
If you haven't already checked out this blog, YOU NEED TO! Always a lot of inspiration to be found here, plus there is an awesome blog candy contest right now with some awesome prizes. Who ever wins is going to have some fun! Be sure to check out the rest of her blog as well!
Friday, September 18, 2009
Two liter Soda Bottle Present

My grandson has a birthday on Sunday and I have really been wanting to try one of the two liter soda bottle projects. He is only 7, so I didn't do anything too fancy for him, but this is the result. I had so much more to put into it, but they wouldn't all fit. What did fit was two hip-hop necklaces, twelve pencils and ten matchbox cars. The cars were in sets of 5 and so I had to take the cars out of the cardboard boxes so they would fit. I did however leave them in the clear plastic trays. It was actually fun trying to see what all I could cram inside the bottle. I used a dark blue/black plaid scrapbook paper for the base then cut the saying and the guitar (designed by Jonathan J) from some light blue vinyl. I was worried about whether or not the paper would adhere to the bottle without coming off. No worries there, I used the permanent scrapbook runner tape by Allary and to be honest, I don't think it is ever going to come off! Thanks for looking!
Thursday, September 17, 2009
Provo Craft has reached a hundred carts with their new Winter Woodland cart, and the best news is that they are celebrating by giving away 100 of their carts over the next 5 weeks! If you would like your chance to win, head on over to the Cricut MB by clicking on the url posted below. Good Luck to everyone! Thanks Provo Craft and Congrats!!!!
http://www.cricut.com/messageboard/tm.aspx?m=5284445 this is where you can sign up
http://www.cricut.com/shopping/ProductDetails.aspx?id=361&s=1&sc=2 This is where you can check out this totally awesome cart!
http://www.cricut.com/messageboard/tm.aspx?m=5284445 this is where you can sign up
http://www.cricut.com/shopping/ProductDetails.aspx?id=361&s=1&sc=2 This is where you can check out this totally awesome cart!
Thursday, September 10, 2009
It's never too soon for a crafter to start thinking about Christmas!

I know, I know.. it seems way too soon to be thinking about making things for Christmas already, but when you are a crafter, you have to get a huge jumpstart on the season just so you can get it all done in time. I have so many ideas for Christmas and so I thought I had better get started.
I wanted to know how the word Noel would look using augsburger initals font and this is the result. I kind of really like it, but think I will be doing this on wood or another medium as opposed to the tile as I couldn't find a long smooth tile to transfer the vinyl onto so I used what I had. As I said, I like it, but I think it would be much prettier if it were on a smoother surface. TFL :)
Friday, September 4, 2009
Snowmen Cards
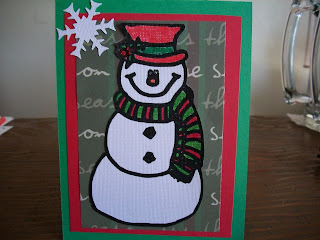
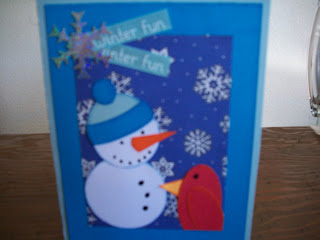
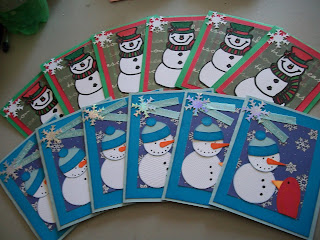
Here are the cards I created for a snowman card swap on the Cricut MB.
I did the red and green "seasons greetings" cards first and so they aren't quite as embellished as the blue "thinking of you" cards. The Blue cards were my take on a card that I had seen on the web site of "Stamp with Heather" http://stampwithheather.typepad.com/stamp_with_heather/2009/08/simply-punches-holidays-its-here.html Her cards are adorable, but I wanted mine to be more snowish looking, so I opted for the blues instead of the primary colors she chose. Also her card is square and mine are rectangle, so I had to do things a bit differently. Anyway, I think that scrapping is all about making things your own! Enjoy
Subscribe to:
Posts (Atom)


